Today thrill seekers can go skydiving, cliff jumping, white water rafting or paragliding, just to name a few. Looking for a little adventure in your blood but it's too wet outside to play? Why not snuggle indoors and thrill your imagination with a haunted vacation? Many hotels, inns, and even castles offer spooky weekend getaways. Perhaps a friendly ghost will fold your clothes and lay them out on the bed; a mischievous one might turn on the lights and radio at 2AM; or perhaps one with a chip on his shoulder might give you a little bump to remind you he's there. You might find it a good laugh or a little fun to shake up the winter humdrums. Below we have compiled a short list of some haunted places to stay. We have tried to collect from across the US and added in a few international destinations just in case you want a ghost with an accent! Enjoy and have some fun!
International Haunts:
Ireland: Ross Castle | United Kingdom - England: The Feathers Hotel Wales: Ruthin Castle
**Many haunted houses seem to get their start from murder or untimely death. Although we have not gone into graphic details here, please note that if you follow any of the links to the right, some of these sites do go into much more (sometimes gruesome) detail!
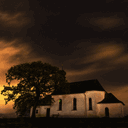
17-Hundred-90 Restaurant & Inn - Savannah, GA
The History: This inn was actually built in 1820, not 1790. First a boarding house and later an inn, this home has had many owners and guests. One of these guests was Anne Powell. The legend says she was unhappily married at 16 years of age to an Englishman. She fell in love with a German sailor who left her "in the family way." She watched his boat sail away and then committed suicide by jumping from the window, landing on the brick pavement below.
The Haunting: Anne Powell is the most famous ghost, believed to haunt guest room 204 from where it is said she jumped to her death. She doesn't seem to be a menacing spirit: she sits beside the fire, lays out guests' clothes on the bed or plays pranks on guests waking them up in wee hours of the morning by setting off the radio alarm. Another ghost in the basement kitchen and restaurant doesn't like women very much and likes to shove them around. But this ghost is countered by the ghost of a merchant marine who will help the staff turn the lights off at closing.
How to see it: Savannah ghost tours stop here for a drink but you can go to the restaurant yourself and have a bite to eat. Or if you really dare, spend the night instead - ask for room 204!
Brumder Mansion - Milwaukee, WI
The History: George Brumder had the home built in 1910 for his son, George Jr. After they sold the home, the house was everything from a boarding house to an activity center for a Lutheran church. They used the home for office space, a theater, and later opened a coffee house with a live music venue. The current owners purchased the home in 1997 and opened the renovated space as a B&B in 1998.
The Haunting: The Gold Room was once the room for one of the Brumder daughters who never married after being spurned in love early in life. She is said to still stay in the room, in fact she was quite appalled and upset when the current owner spent the night in this room with her dogs - no dogs allowed! Your dreams will be haunted if any dogs sleep on the bed!
How to see it: It's a Bed & Breakfast, so take the plunge and spend the night - request the Gold Suite! You can even join a ghost hunting seminar or enjoy a haunted history dinner! For more information, click here.
The Carolina Inn - Chapel Hill, NC
The History: Owned by UNC, this inn was built by a UNC graduate in 1924. Throughout its history it has been used by the campus to host conferences, guests and alumni. Today the proceeds from the inn are given to the university library.
The Haunting: Professor William Jacocks likes to haunt room 252. Although guests do claim to have encounters with the professor, the hotel staff say he has never frightened anyone to the point of packing their bags and running. Instead he is a friendly ghost who plays pranks such as holding the doorknobs so rooms won't open, rustling papers, and making the occasional noise. Some claim there are additional ghosts walking the halls and looming over their shoulder, but always more curious than menacing.
How to see it: You can spend the night in this historic hotel
Crescent Hotel - Eureka Springs, AR
The History: Founded in 1886, the Crescent Hotel started its career as a sleek and elegant hideaway for the Victorian wealthy. However, not able to stay afloat the hotel closed. It was reopened in 1908 as the Crescent College and Conservatory for Young Women. But this school closed in 1924. In 1937 it was opened as a hospital and health resort. Norman Baker claimed to have a cure for cancer but was met with scrutiny as it came to light that he had no medical education. He was later imprisoned on mail fraud. It wasn't until 1946 that efforts were made to reestablish the hotel.
The Haunting: Perhaps the fresh spring water under the hotel attracts spirits thirsting for a little human interaction. This hotel has many different haunted areas from guest rooms, to the lobby, to the grounds. Guests have seen a women in the hall, a tall man knocking on the doors, and former cancer patients and nurses to name a few. A long list of guest experiences can be found at the hotel's ghost website.
How to see it: The hotel offers history tours for groups of 10 or more. Ghost tours are available by Eureka Springs Ghost Tours.
Driskill Hotel - Austin, TX
The History: Jesse Lincoln Driskill opened this hotel in 1886. The hotel was grand and luxurious, funded by his success as a cattle baron. In 1888, the family lost its fortune due to drought and a cold winter that killed most of the cattle. The hotel then changed from owner to owner with the most recent change of hands in 1995.
The Haunting: Driskill is claimed to still wander the hotel, puffing cigar smoke while he turns lights on and off. There is the ghost of a small girl, daughter of a Senator who was left unattended and fell to her death while playing with her ball - she can still be heard bouncing the ball today.
How to see it: The hotel is open to guest today and offers all kinds of pampering.
The Feathers Hotel - Ludlow, Shropshire, UK
The History: The original building was built in 1619 and has been added to and modified since. First a private residence, it was changed to an Inn in 1670 after the English Civil War and would remain one for the next 200 years! In 1863 it changed to a hotel and started to acquire more land and expand. Why feathers? There are faded motifs of ostrich feathers on the outer woodwork still visible. They were a symbol of the Prince of Wales and "en vogue" at the time of construction. Not to mention the town of Ludlow was royalist even during the English Civil War.
The Haunting: There is a female "guest" in room 211 who is known to bother women rather then men in the room, pulling their hair and letting them know they are not welcome. There are a couple gentlemen ghosts roaming about including one who is accompanied by his ghost dog!
How to see it: You can join on a ghost hunting adventure either with Eerie Evenings or Haunted Breaks. Or you may opt to spend the night and enjoy the historic surroundings.
Heceta House - Yachats, OR
The History: This house accompanies a lighthouse on the Oregon coast built in 1894. Many families occupied the house complex over time which included a post office, school and the light house. But it is only the keeper's house that has tales of hauntings. Many believe this is the mother of child who fell off the cliffs back at the turn of the century.
The Haunting: The ghost named Rue is said to be an extra caretaker of the house. She makes it known if she is displeased with any activity in the house. One of the more humorous accounts was of her screaming in the middle of a card game, she didn't want them playing cards in her house!
How to see it: This house is now a bed and breakfast. It also has guided tours from its interpretive center. Although the current owners don't play up and advertise the ghost they have said guests have told them of strange encounters.
Hotel Del Coronado - San Diego, CA
The History: Babcock and Story built this resort to be the "talk of the Western world" in 1888. Since then it has been visited by presidents, foreign dignitaries, celebrities and heroes like Charles Lindbergh and Thomas Edison. The hotel was famous as a backdrop for "Some Like It Hot" starring Marilyn Monroe, Tony Curtis and Jack Lemmon.
The Haunting: According to the hotel website, the tales of ghosts started with the untimely death of Kate Morgan. She was a guest in November 1892 that never left. She came to meet her estranged husband but he never showed. Kate was then found dead on the hotel steps leading to the ocean. She had died of a gunshot wound to the head that was officially deemed a suicide but is speculated to this day by some to be a case of murder. She likes to slam doors and randomly turn on the TV. Some have also seen indentation in the sheets as if someone was sleeping there. There are other ghosts in the hotel as well that love to flicker the lights, provide cold spots and make some random noises.
How to see it: Of course you can stay at this stunning resort and enjoy the spa, golf course, pool or take some surfing lessons. To find out more click here (Kate's room was 312, then renumbered to 3312 and now to 3327 - check with staff to verify your request).
Hotel El Convento - Old San Juan, Puerto Rico
The History: This former Carmelite convent named The Monastery of Our Lady Carmne of San Jose was founded in 1651. The nuns left this convent in 1903 and site fell into ruin until 1962 when Robert Woolworth purchased it to make it into a resort.
The Haunting: Dona Ana was a noblewoman who lost her husband in the war with the Dutch and then turned to her faith. She donated the land for the Carmelite convent. It is said her spirit and those of nuns can be seen about the grounds and gliding through the halls.
How to see it: For information about how to enjoy a luxurious stay with these faithful spirits
Jerome Grand Hotel - Jerome, AZ
The History: Built in 1926, this building was originally the United Verde Hospital. The hospital was built to be fireproof and withstand blasts from the dynamite mining nearby. One of the best hospitals in the west, it unfortunately was phased out when the mining in the area began to slow down and closed by 1950. The building stood empty until 1994; it had been a time capsule having been unchanged for 44 years. It is now being restored as a hotel with many of the rooms already completed and open for guests.
The Haunting: Being a hospital, there were many patients that perished in its walls. However, there were deaths of two orderlies that many believed to have been murder. There is also one recorded suicide. When the building lay dormant for 44 years, locals claimed they would still see lights burning in the vacant building. Since being reopen, more paranormal activity has been noticed. The most common is for guests to feel temperature drops and hear coughing or labored breathing in empty rooms or corners of their own guestroom. One ghost is said to be a woman who died in childbirth. She is upset that her child was buried in an unmarked grave and prowls the ground looking for the babe.
How to see it: You may stay in the hotel today. Room rates begin at $110 and go up from there. Being the highest point in the Verde Valley, it offers some great views. And if you're lucky, maybe a glance at a ghost or two!
Kehoe House - Savannah, GA
The History: This home was built in 1892 for William Kehoe and his family. The large family (they had 10 children!) kept the home until 1930. After that the home became a boarding house, funeral parlor, and a private residence. In 1992 the home opened as a B&B, it changed ownership in 2003, but remains an inn with a B&B atmosphere.
The Haunting: The main tragedy of the house (that we know of) was the death of the Kehoe twins who died when playing around the chimney. Children can be heard running the halls and some guests have even had children check in on them in their rooms. But if you don't see the children, their mother Annie is reputed to still wander the rooms, making sure to tuck in all the guests at night!
How to see it: Why not spend the night? Ask for rooms 201 or 203.
Kewaunee Inn - Kewaunee, WI
The History: Built in 1912 by William Karsten this inn is still commonly known as the Hotel Karsten. Father and son managed this hotel until William Karsten Jr.'s death in 1964. The hotel then changed hands and received various facelifts. The most recent owners renamed the hotel to the Kewaunee Inn at Hamachek Village in May 2008.
The Haunting: The ghosts at the Kewaunee Inn didn't start to bug the living until after renovations started in 1966. The inn website mentions the triad of ghosts include William Karsten Sr, Billy Karsten III (who died at 5 years of age shortly after his grandfather), and Agatha the housekeeper. Agatha seems to be the most active, floating about the halls and popping up behind you when you look in the mirror! She doesn't seem to like men much - so any male guests be on your guard! William likes to have a drink at the bar now and then and Billy still runs up and down the hall playing.
How to see it: Brave enough to spend the night?
Lemp Mansion - St. Louis, MO
The History: This house was purchased by William Lemp around 1864 to use as a residence and office for the family brewery. William's father had used a family recipe/method to create a lager beer. This beer quickly became popular and William's father abandoned his grocery store to become a full time brewer. The beer continued to be made by the family until 1922 when family mishap and prohibition forced them to shut down and sell for good. The mansion itself has a sorrowful history with one brother dying under mysterious circumstances and three other men of the family committing suicide inside.
The Haunting: With three suicides one can easily guess where the idea of ghosts haunting the mansion started. However, the families odd history also adds fuel to the imagination. There is the rumor that William Lemp had an illegitimate son with down syndrome who was kept hidden in the mansion attic his whole life. He is now said to be seen haunting the mansion and has the nickname "Monkey Face Boy." Tales of haunting first started after 1949 when the mansion was sold and turned into a boarding house. Strange knocking and footsteps throughout the mansion scared the tenants away so the house started to run into disrepair. In 1975, the mansion was saved and renovated and turned into a restaurant and inn. All types of sights and sounds have continued and are still reported today.
How to see it: Spend the night! Or take a tour if you're too scared... The mansion is a bed and breakfast that offers tours and a restaurant to those who don't want to spend the night. They also host a Halloween Party and Murder Mystery Dinner Theater.
Lizzy Borden House - Fall River, MA
The History: As with so many haunted homes, this story begins with a murder. On the morning of August 4, 1892, Andrew and Abby Borden were murdered by ax in their home. Their eldest daughter, Lizzy, was tried and latter acquitted of the murders. However, she was ostracized from the community for the rest of her life. Some consider that she had a split personality, even those close to her recall erratic and violent behavior. And of course there was the creation of the rhyme:
Lizzie Borden took an ax
Gave her mother forty whacks;
When she saw what she had done
Gave her father forty-one!
The Haunting: There is a strange woman who tucks guests into bed and perhaps the same woman can be heard weeping in the night. Objects move on their own and electrical equipment such as lights and cameras have some interference. Many claim the most active room is Lizzy's old bedroom - which you can stay in if you want...
How to see it: The home is now a bed and breakfast. You may spend the night, take a tour or even spend a weekend at Ghost Hunter University!
Magnolia Mansion - New Orleans, LA
The History: This home was built in 1857 by Alexander Harris. After Alexander died of yellow fever his widow remarried and sold the home to the Maginnis family. John Maginnis owned a cotton mill and it was rumored he was struck by lightning because of the cruel way he treated his employees. In 1939, John's daughter inherited the home and willed it to the Red Cross. The Red Cross used the home to train nurses for WWII and the Korean War. In 1954 the home was again sold into private ownership. Magnolia Mansion was renovated in 2001 and opened as a B&B in 2002.
The Haunting: When renovating the home, the crew had to stop as an oily substance appeared over the walls. The owner then verbalized her plans for the place out loud so the ghosts would know exactly what she was up to. She told them she was improving the home and the ghosts would not be able to scare the guests away. This appeased them for awhile. However, ghosts are still reputed to slam doors and snuggle into bed with guests on occasion. Many guests have photos of orbs and a few extra faces from their visits as well.
How to see it: This adult catering B&B offers a great escape to any non-smoker over 21 years of age. Specializing in romance with Elopement and Wedding packages, the B&B also has fun with their ghosts offering a Romantic Ghostly Getaway Package which includes a room, treats and ghost walking tours.
Mason House Inn - Bentonsport, IA
The History: This hotel was built in 1846 for steamboat travelers along the Des Moines River. Later, the Mason House was used as a 'holding hospital' during the Civil War for soldiers being transferred to Keokuk. It also served as a 'station' along the underground railroad. The Mason House keeps its name from the Mason family who owned the property for 99 years.
The Haunting: Three of the owners have died in the building and there was also one murder in one of the guest rooms. In 1860 poor Mr. Knapp had been drinking and accidentally went to the wrong room. The occupant thought he was being robbed and stabbed Mr. Knapp in self-defense. The home had also been a 'holding hospital' in the Civil War and some patients may have died in the home. Also a Doctor renting a room in the 1940s died in the building. All in all, a great hangout for ghosts. The ghosts come in many forms. There are wisps of fog and cold spots to actual figures who appear and disappear from sight. There is a boy that plays tricks; he likes to rustle sheets and tug at guests as they sleep. There are footsteps, thuds and a woman in white. An abundance of ghosts and paranormal events for all!
How to see it: Today you may stay at this B&B for about $80/night ($125 if you are staying in the restored caboose!). Request to stay in the main house on the 2nd floor (rooms 5 & 7) for the best chance of paranormal dreams! Ghost Hunting 101 and 102 classes are also available about twice a year and a Halloween Ghost Walk around Oct 31st.
McCune Mansion - Salt Lake City, UT
The History: This mansion was built in 1900 by a railroad tycoon named Alfred W. McCune. After leaving for California in 1920, the McCune's donated the mansion to the Latter-Day Saint Church. It was then turned into the McCune School of Music. It later became a Brigham Young University Salk Lake City Center and Virginia Tanner Modern Dance School. In 1999 it was purchased by Phil McCarthy who worked to restore the mansion and open it as a hotel.
The Haunting: Music is said to still haunt the McCune halls. A small room under the stairs was used by the McCune's as a stage for hired musicians. The whole house would be filled with music but their guests did not know from where it came. It is said this music still fills the air. Other happenings include doors locking that are not fit with locks, doors opening on their own and lights going on and off on their own.
How to see it: You can schedule a tour of the mansion through the Utah Heritage Foundation.
Myrtles Plantation - St. Francisville, LA
The History: This home was built by David Bradford in 1794 but stories of hauntings did not start until the 1950's. The house had a long history with many different owners. There is only one recorded murder of William Winter in 1871. However, there are many tales that are told about the home to justify the hauntings. Most of these seem to be fabricated tales, but many say that is just because the house is so haunted, people needed to make up some kind of explanation.
The Haunting: Among the haunting activity is the ghost of a woman in a green turban who some believe to be the ghost of a slave killed for poisoning the head mistress and her two daughters. Others claim this ghost is not a young slave but an older, unknown woman. There is also a little girl who has appeared as well as a frustrated piano player who continuously practices the same cord over and over on the old piano.
How to see it: You can dine in the restaurant, take a tour or spend the night. The choice is up to you.
The Queen Mary - Long Beach, CA
The History: Her maiden voyage was May 27, 1936 but with the coming of WWII she was refitted and used as a troop ship housing 5500 souls by May 5, 1940. By the end of the war it was used to transport as many as 12,886 war brides and children from Europe to the U.S. and Canada on six voyages in four months. More war bride voyages would follow. It became a cruise ship in 1963. By 1967 it was purchased for Long Beach, CA to act as restaurant and museum with the first hotel rooms opening in 1972.
The Haunting: The first class swimming pool has some of the most recorded ghost sightings and noises. Many women dressed in 1930 swimsuits have been sighted. But the spirits like to wander and have been seen in many parts of the ship - especially the engine room where two men were crushed to death by the heavy "Door 13". Those who take the self-guided walking tour of the ship have been spooked more than once!
How to see it: Brave enough? Click here to find out how to spend the night or click here to take a tour with Ghost and Legends of the Queen Mary group. The tour is technically enhanced to make certain you get a few jumps and spooks. The hotel also hosts a 'Terrorfest' of haunted mazes on Halloween.
Ross Castle - Ross, County Meath, Ireland
The History: This area shows record of settlement since the Iron Age. The castle tower was completed in 1537 by Richard Nugent, 12th Baron of Delvin. A family loyal to the English crown for their title and rank hoped to received the extra boon of £10 given as encouragement for each fortification built in Ireland. In time the Nugents began to marry the once rival Celtic nobles especially the O'Reillys. In 1644 the castle was pulverized by Cromwellian soldiers in retribution for Myles O'Reilly's defiance. Restoration was begun by the family in the 19th century and the castle was later modernized with plumbing and electricity.
The Haunting: The castle's founder, Richard Nugent was also known as the Black Baron and, you guessed it, he had a reputation for being quite unpleasant. The Black Baron had a beautiful daughter named Sabina who had the unfortunate luck to fall in love with Orwin O'Reilly (at this time still an enemy). Moved by love to give up their home, family and wealth, they decided to elope. However, as they made their escape by boat a storm came up and it capsized. Orwin died but Sabina lived. Crushed with heartache, she pinned away in Ross Castle tower until she finally gave up the ghost which in turn walks the halls to this day. She is said to sometimes be heard screaming! The Black Baron is also rumored to haunt the grounds and can be quite unpleasant.
How to see it: Besides ghost hunting, you can go fishing, golfing, horseback riding, sailing, boating, hiking, cycling, go see the races or even take flying lessons! Plenty to do and see in a romantic setting.
Ruthin Castle - Ruthin, North Wales, UK
The History: Legend has it that the original castle was a wooden fort lorded by Huail. He fought King Arthur and wounded him in the knee. A truce was called but Huail later mocked King Arthur and was beheaded. The first stone structure was put up by King Edward I in 1277 and the castle was owned by the crown off and on until sold by Charles I in 1632. The modern stone structure was built in 1826. However some of the older walls, dungeons and tunnels are still standing today.
The Haunting: This castle comes with its own Grey Lady, dating back to the time of Edward I, this ghost was sentenced to death for killing the lover of her husband. Soldiers are said to still march around the grounds and prisoners long dead are still heard moaning in agony.
How to see it: If you don't find ghost hunting or random spooks exciting enough, this castle offers other entertainment including medieval banquets (one even with a murder mystery theme!), golf, and romantic getaway packages.
The Sagamore - Bolton Landing, NY
The History: This hotel was originally built in 1883 to provide a getaway on Lake George in the Adirondack Mountains. This historic building suffered two fires but was reconstructed in 1930. The resort was meant to be a retreat for the wealthy and is still neighbored by palatial mansions across the lake.
The Haunting: This hotel has many ghosts including one of a little boy on the golf course! This boy chased balls and sold them when alive. He died in a tragic accident when he was hit by a car running after a ball. Now his shadowy form can be seen running after golf balls on the course. He likes to steal balls and laugh at golfers as they look for them. When they give up he tosses the ball at them, again, laughing. Other ghosts include the guest who come down from the second floor for dinner every night and wait patiently in the reception area before they literally vanish. Then there is the portly cigar smoker in the elevator who may not appreciate the non-smoking policy these days.
How to see it: You can stay in the hotel, vacation lodges or a castle (if you have the cash!). Themed getaways are available including the Murder Mystery Weekend Oct 17-19, 2008
The Stanley Hotel - Estes Park, CO
The History: Six miles from Rocky Mountain National Park, this hotel has famous views and offers a serene escape. F.O. Stanley created this hotel after moving to the west when forced to by poor health. Besides the hotel he helped to create the sewer, power and water supply for the area. A recent claim to fame is that a stay in this hotel inspired Stephen King's The Shining.
The Haunting: Both F.O. and his wife Flora haunt the hotel. They are amicable ghosts that enjoy hanging about the rooms they loved so much such as the Billiard room and Ballroom. Rooms 407 and 418 have reputed activity of lights going on and off, noises and of course rascally kids playing in the nearby hallway. One story relates some guests checked out early as the kids playing in the hall kept them up all night. When the hotel staff looked at the register there were not any kids as guests (at least not any live ones!).
How to see it: Not only can you spend the night but you can sign up for a Historic Ghost Tour that tells you all the history that has created a haunted playground. The hotel has fun with the reputation and is hosting 'The Shining Ball' this year on Oct 25 and 31, 2008!
The Stone Lion Inn - Guthrie, OK
The History: F.E. Houghton built this mansion in 1907. It served most of its years as a residence and later was turned into a funeral home. The only person to die in the home seems to be a young girl who died of whooping cough after receiving the wrong medicine.
The Haunting: After turning this mansion into an inn, the new owners woke up at night to the sounds of footsteps and doors opening and closing. They called the police but no intruder was found. Soon after they realized they had their first "guest" who may be a small girl as she likes to take out the toys at night to play.
The Story Inn - Nashville, IN
The History: This historic inn is located at the boarders of Brown County State Park and Hoosier National Forest. This inn and its collection of buildings is actually what remains of the town of Story that was established in 1851, set up as a lodging community.
The Haunting: The Story Inn is haunted by a lady in blue who floats about the second floor of the general store that has been turned into guestrooms. There has also been activity in the restaurant below. A guestbook details the experiences of the spooked over the years.
How to see it: Snuggle in for the night. If you don't want a ghost watching over you there are other cabins available in this small community.
Thornewood Castle - Lakewood, WA
The History: Thornewood Castle was built for Chester Thorne, a successful founder of the Port of Tacoma. This Tudor/Gothic estate was completed in 1911. Inspired by the estates in Britain, the stained glass windows were even imported from a castle in Europe. The castle has many different imports that add to structure and contents of the building. One of the more interesting aspects is the "wishbone sticks" left by the Native American workers who helped in the construction. These sticks help to ward off evil and are found at the foundation in the basement.
The Haunting: There are multiple photographs taken of orbs throughout the castle and reports of objects moving on their own. Tape recorders have picked up voices, one of an unknown child. One child did drown in the lake and is said to haunt its shore, perhaps they visit the house as well? Overall, the spirits at Thornwood seem to be a good natured sort. There is not a violent history attached to this home. Although the wife of Mr. Thorne is said to haunt the halls, this is more because she likes the place rather than she is out to get anyone. In fact, some believe Thornwood Castle acts as a vortex and can attract ghosts from the other side. Some guests have reported making contact with loved ones from their lives who have no connection with the castle.
How to see it: You may stay in the castle as it is now a B&B. There are Candle Light Tours: for $100 and the cost of a room you can spend the night exploring the haunted halls with a small group of ghost hunters.